How to use Robolytix with WorkFusion
Robolytix is the key online analytic and monitoring tool for Robotic Process Automation using Sonar technology to evaluate, audit, monitor, and improve the performance of robots operating on any application or RPA platform. This tutorial will guide you to analyze your processes in WorkFusion.
WorkFusion is a combination of a software-as-a-service (SaaS) cloud computing platform with a process designer, that enables you to automate, optimize, and manage any repetitive business process using one intuitive interface. WorkFusion can be used to fill data gaps, manage seasonal spikes, and source "long tail" announcements securely. WorkFusion does this by combining crowdsourcing with artificial intelligence. The company has made deals with freelance labor markets around the world to take care of the business processes that corporations want to outsource.
Prerequisites
To use Robolytix with WorkFusion, it is necessary to have a Robolytix account. If you do not have one, you can create the account at Robolytix.com and make basic settings using the onboarding wizard.
Video Tutorial
Use Robolytix script
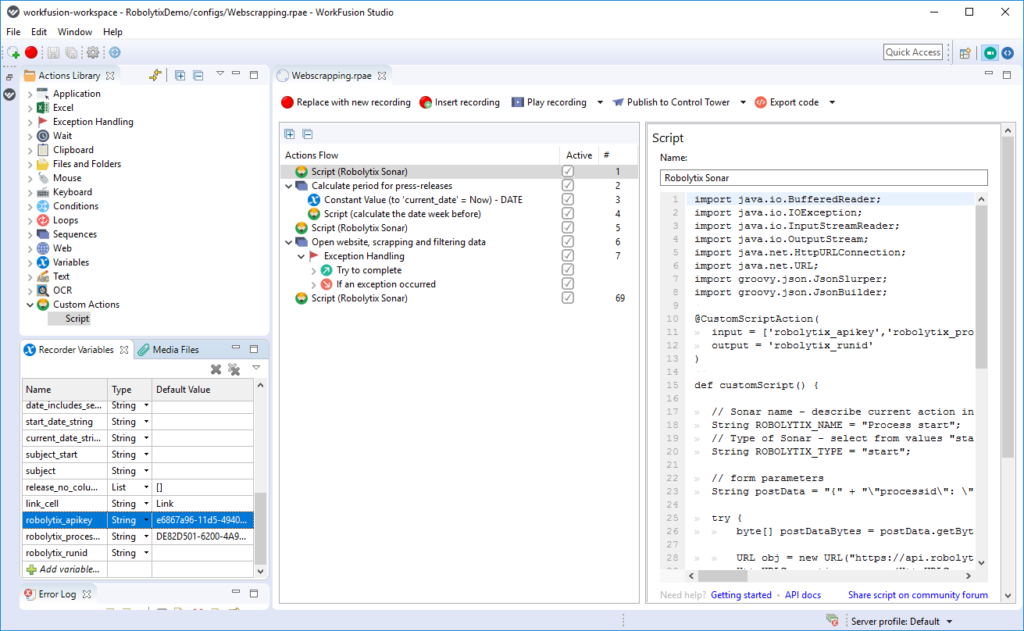
We have prepared a script containing Robolytix Sonar action. This Robolytix Sonar script is written in Java programming language and you can use it as a custom action in WofkFusion Studio.
- Open WorkFusion Studio and edit your recording (you can switch to Record perspective in the menu Window → Navigation).
- From Action Library on the left choose Custom Actions → Script and add it to the recording.
- Download Robolytix Sonar script.
- Copy script content to the newly added action.
Connect WorkFusion to the Robolytix
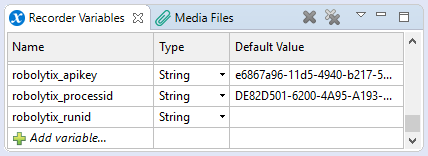
To connect your Robolytix account to WorkFusion, you must provide access to processes in your account. In WorkFusion, the best way to do it is by using variables. Create three following variables in the Recorder Variables window:
- robolytix_apikey - Stores key for validating API requests
- robolytix_processid - Identification of selected process in Robolytix
- robolytix_runid - Identification of one process execution
You must obtain an API key for setting up the connection. To get your key, log in to your Robolytix account and generate it in the settings menu. See detailed walkthrough Obtain API key.
- From the left navigation menu, select Settings. On the Settings page, select API keys in the menu and then click on the New API key button.
- Copy the unique key and set the value of robolytix_apikey to this key.

Now create a process in Robolytix and set the value of robolytix_processid to the process GUID. It is located in Settings ->Process -> General tab. You can create a new process in Robolytix by following a detailed guide Setting up processes in Robolytix.
Keep the default value of robolytix_runid empty. The first Sonar in the process will set its value.
Use Sonars in WorkFusion
Process monitoring is performing by using Sonar checkpoints. The Sonars are at the beginning of the process, at all ends of the process, and at main branches in the process. Each Sonar embedded in the process contains the following settings:
- Name
The name of the Sonar should reflect the state of the process and clearly describe the surrounding steps in the process. - Process
Select a process from the list. The list contains all processes from your Robolytix account. If you don’t see your process in the list, make sure the process you want is already existing in your Robolytix account.
- Type
The type of Sonar determines its location within the process and must be one of the following values:
| Start | is the first checkpoint in the process.
| Continuous | are checkpoints anywhere in the process. Of course, more continuous Sonars means more advanced statistics.
| End | is the last checkpoint in the process. The process can have one or more “end” Sonars in different branches of the process.
| Error | is a special type designed to receive error information about process exceptions.
- Run identification
For advanced reporting, we recommend identifying each separate run process by a unique identifier. The unique identifier can be a variable generated by “start” Sonar and passed to all other Sonars in the process.

Add Sonar action to your processes
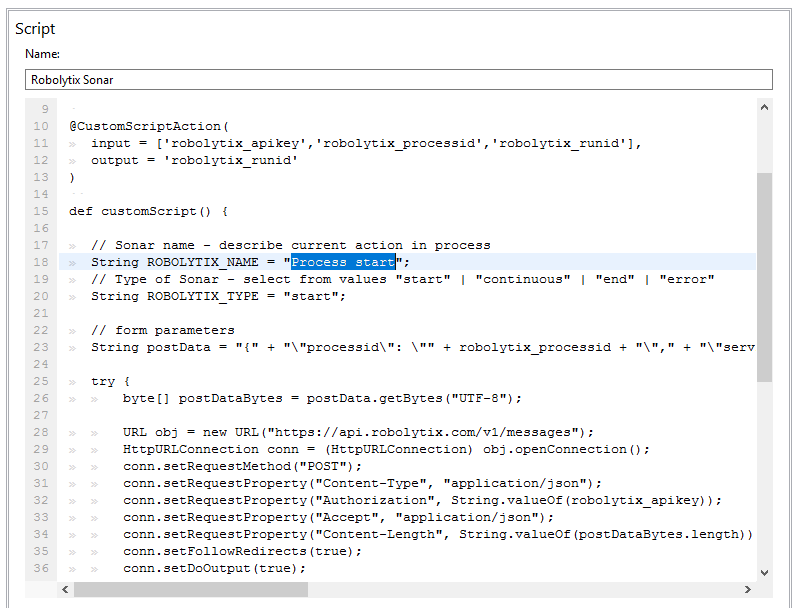
Now you can add Sonars to your processes. Each Sonar is defined by its name and type. At the beginning of the custom action is located definition of two variables:
// Sonar name - describe current action in process
String ROBOLYTIX_NAME = "Process start";
// Type of Sonar - select from values "start" | "continuous" | "end" | "error"
String ROBOLYTIX_TYPE = "start";
The first step is to add Sonar with type start to the beginning of the process. Set field Name properly with clear description and choose your process in Robolytix. You can create a new process in Robolytix by following a detailed guide Setting up processes in Robolytix.

The second step is to mark the end of the process. Add Sonar with ROBOLYTIX_TYPE variable value end and set ROBOLYTIX_NAME variable value.
Now you can add as many Sonars as you want. A good practice is to add Sonar to each important branch and each big loop in your process. Use Sonar type common, or type error for handling errors.
Show your data in Robolytix

After proper process execution visit the Robolytix platform and check process statistics. It is possible to show all recent messages sent to the specified process. Go to Settings -> Processes menu and select the list of process messages.
W
If you have questions or need help with implementation please contact us at support@robolytix.com.
There is also a Support Forum for further questions.


