How to use Robolytix with Automation Anywhere
Robolytix is the key online analytic and monitoring tool for Robotic Process Automation using Sonar technology to evaluate, audit, monitor and improve performance of robots operating on any application or RPA platform. This tutorial will guide you to analyze you processes in Automation Anywhere.
Automation Anywhere is a developer of robotic process automation (RPA) software, which employs software bots to complete processes. Users need little to no programming language to start creating robots, primarily because of the simple drag and drop system the platform has in place.
Automation Anywhere consists of 3 core components – development environment called Bot Creator, Control Room for management of bots and Bot Runner executing bot on dedicated machines.
Prerequisites
To use Robolytix with Automation Anywhere, it is necessary to have a Robolytix account. If you do not have one, you can create the account at Robolytix.com and make basic settings using the onboarding wizard.
Video Tutorial
Use Robolytix MetaBot
We have prepared MetaBot containing Robolytix Sonar logic. This Robolytix Sonar MetaBot calls Robolytix API and you can use it in each your bot in Automation Anywhere.
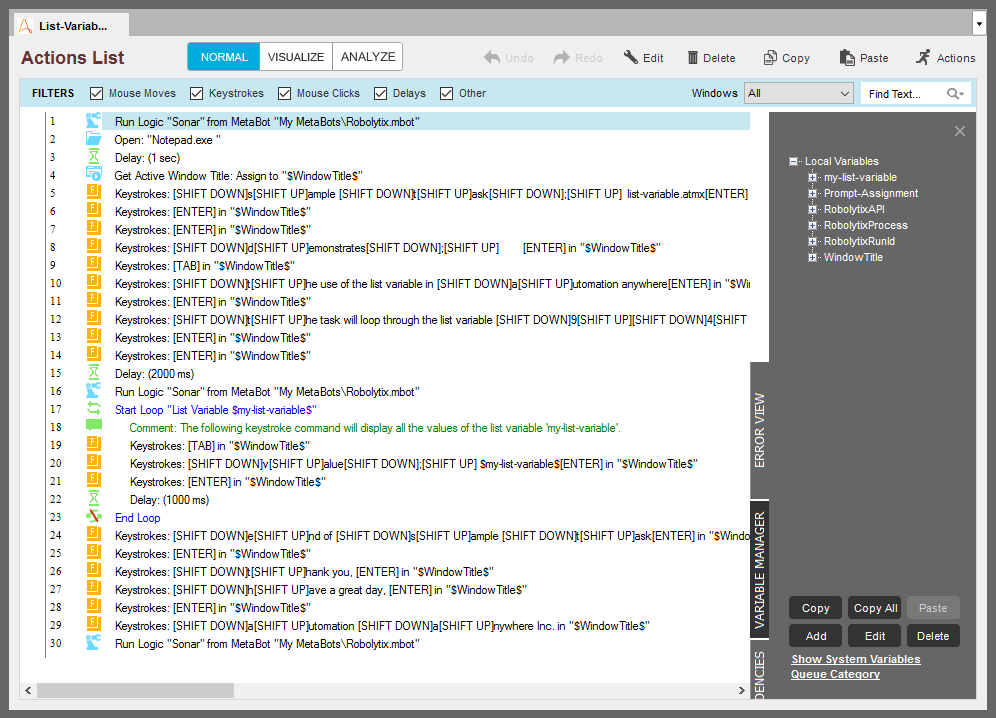
There is also a demo Bot showing usage of our MetaBot. You can get it here. It comes from List-Variable.atmx, one of the official example Bots shipped with Automation Anywhere.
You must download this MetaBot to a directory with other metabots. Then you can use it in all other tasks or bots.
- Open Automation Anywhere and from the left menu select MetaBots.
- From tom menu select Actions → Locate on Disk and open selected directory.
- Download Robolytix Sonar MetaBot.
- Move downloaded file to this Automation Anywhere\My MetaBots directory.
Connect Automation Anywhere to the Robolytix
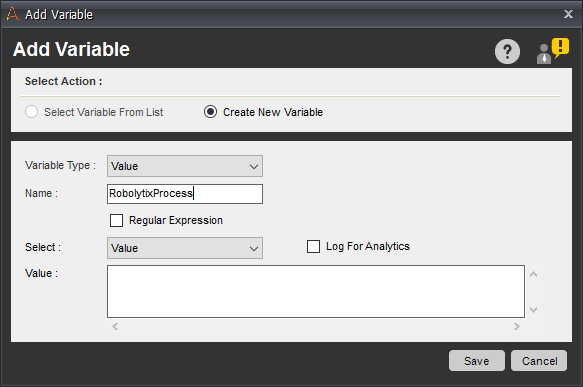
To connect your Robolytix account to Automation Anywhere, you must provide access to processes in your account. In Automation Anywhere, the best way to do it is by using variables with values identifying your account and process. Create following three variables in Variable Manager in your task:
- RobolytixAPI - Stores key for validating API requests
- RobolytixProcess - Identification of selected process in Robolytix
- RobolytixRunId - Identification of one process execution
You must obtain API key for setting up the connection. To get your key, log in to your Robolytix account and generate it in settings menu. See detailed walkthrough Obtain API key.
- From the left navigation menu, select Settings. On the Settings page, select API keys in the menu and then click on New API key button.
- Copy the unique key and set value of RobolytixAPI to this key.

Now create process in Robolytix and set value of RobolytixProcess to the process GUID. It is located in Settings ->Process -> General tab. You can create new process in Robolytix by following detailed guide Setting up processes in Robolytix.
Keep default value of RobolytixRunId empty. The first Sonar in process will set its value.
Use Sonars in Automation Anywhere
Process monitoring is performing by using Sonar checkpoints. The Sonars are at the beginning of the process, at all ends of the process, and at main branches in the process. Each Sonar embedded in the process contains the following settings:
- Name
The name of the Sonar should reflect the state of the process and clearly describe surrounding step in the process. - Process
Select a process from the list. The list contains all processes from your Robolytix account. If you don’t see your process in the list, make sure the process you want is already existing in your Robolytix account.
- Type
The type of Sonar determines its location within the process and must be one of the following values:
| Start | is the first checkpoint in the process.
| Continuous | are checkpoints anywhere in the process. Of course, more continuous Sonars means more advanced statistics.
| End | is the last checkpoint in the process. The process can have one or more “end” Sonars in different branches of the process.
| Error | is special type designed to receive error information about process exceptions.
- Run identification
For advanced reporting, we recommend identifying each separate run process by a unique identifier. The unique identifier can be a variable generated by “start” Sonar and passed to all other Sonars in the process.
Add Sonar action to your processes
Now you can add Sonars to your processes. Each Sonar is defined by its name and type. At each step you want to analyze, add Robolytix Sonar MetaBot and set all variables.
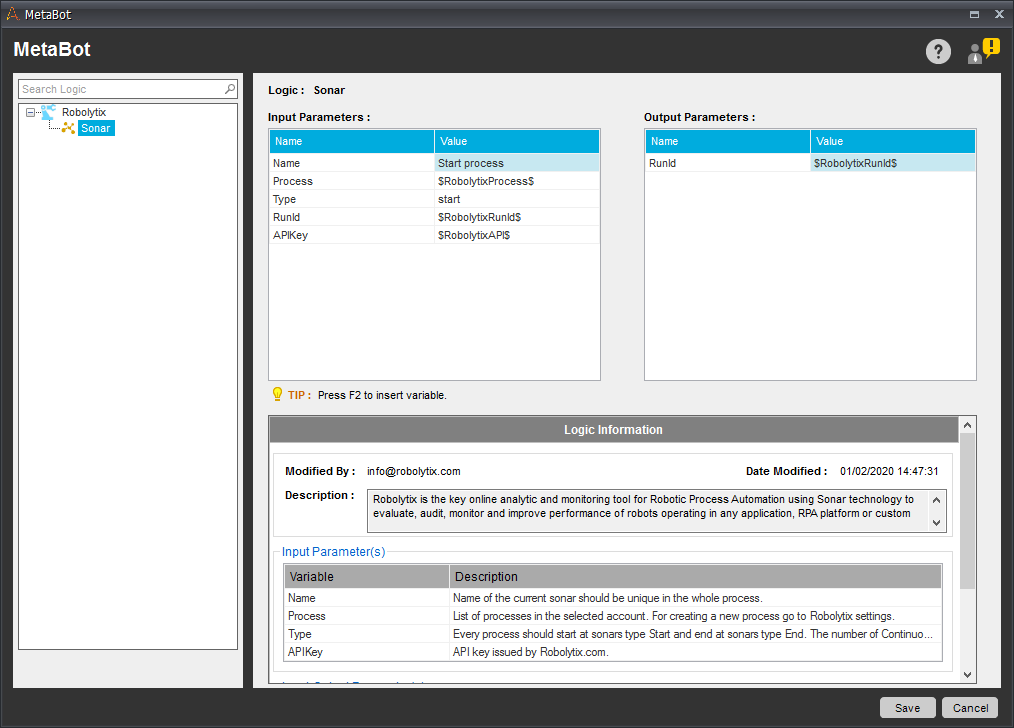
First step is to add Sonar with type start to the beginning of the task. Set input variable Name to clear description of step. Then set Type variable to start. Then set variables Process, RunId and APIKey to its corresponding local variables. Use F2 keyboard shortcut for bring up Insert Variable dialog window.
Then set output parameter RunId to RobolytixRunId local variable from your task.
Second step is to mark end of the process. Add or copy Sonar with Type parameter set to value end and set Name parameter value.
Now you can add as many Sonars as you want. Good practice is to add Sonar to each important branch and each big loop in you process. Use type common for all further Sonars, or type error for handling errors.
Show your data in Robolytix

After proper process execution visit the Robolytix platform and check process statistics. It is possible to show all recent messages sent to the specified process. Go to Settings -> Processes menu and select the list of process messages.
If you have questions or need help with implementation please contact us at support@robolytix.com.
There is also a Support Forum for further questions.


